10 min read


What is the Cloudflare WordPress Plugin?
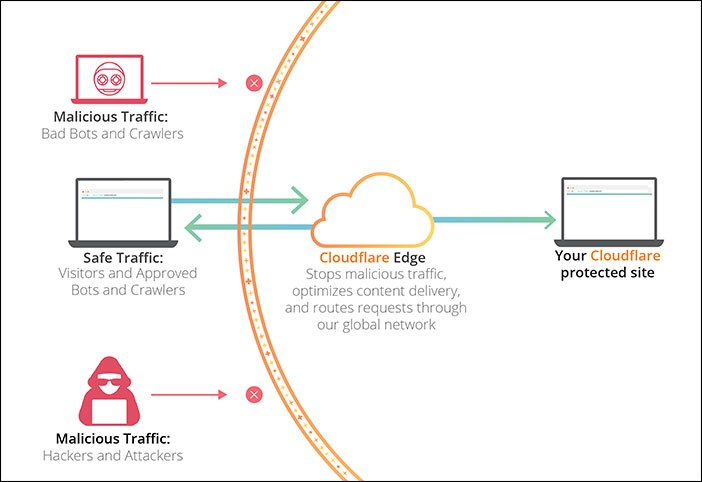
In addition to being a powerful plugin, Cloudflare is a popular WordPress firewall and CND service. Cloudflare provides users with a free CDN to increase your website speed. You also receive a powerful suite of security features for your small business site. The free WordPress plugin improves your SEO, increases your page load speed and provides protection for vulnerabilities specific to WordPress and DDoS attacks. The plugin provides the same benefits you receive with Cloudflare. For more information look to the image below:
(Image Credit: Cloudflare)
Only one click is required to install Cloudflare, with your settings developed specifically for your WordPress platform. A content delivery or CDN system encompasses distributed servers enabling files to be delivered by your website to users faster according to their geographic location. The majority of web hosting servers host the visitors from your website via a single location. The same server is accessed by all of your users regardless of their locations.
The result is often a delay of user content delivery for visitors located farther away from the central hosting server for your website. This issue is resolved by CDN because multiple edge servers are set up in different locations throughout the world. Static content is cached by these CDN servers for the central server for your website. Once requested, you have access to these servers. When you place a request, the closest CDN server to your location handles everything.
A good example is an individual located in the United States interested in accessing a website hosted in the United Kingdom. This request will be served by a CDN server in the United States as opposed to a server in the United Kingdom. This is because every user request is handled by the nearest CDN server to mitigate the distance between the server for the website and the location of the visitors. This means your website will load quicker for your visitors despite their geographic locations.
When your website loads quicker, your SEO rankings will increase slightly and the experience of your customers will improve. A CDN also decreases your primary server load to provide crash protection during spikes in traffic. The most popular CDN provider on the web is currently CDN. The large network of servers is distributed globally to automatically deliver fast content and cache static content. Cloudflare is also a distributed proxy server and website firewall based in the cloud.
All incoming website traffic is monitored with suspicious traffic blocked before reaching your server. A free basic plan appropriate for small business blogs and websites is available through Cloudflare. In addition to the free plan, you can access all of the available features with a paid plan for a set monthly fee.
Is Cloudflare Good for WordPress?
Cloudflare is one of the most popular firewalls and WordPress CDN services currently available on the market. The question of Cloudflare being good for WordPress is one of the most frequently asked. The answer is yes for several reasons. Cloudflare offers you protection for the most common vulnerabilities associated with WordPress in addition to a powerful suite of security features ideal for smaller business websites. The Cloudflare WordPress plugin ensures you receive an excellent add-on.
You should consider using Cloudflare for your WordPress business website as both a CDN and a reverse proxy. The popularity of the CDN is partly due to the convenience of a free plan for both personal blogs and websites. You will receive access to the global Cloudflare CDN and security and performance features including:
- DDos Protection
- High-quality video streaming
- HTTP/2
- Load balancing
Test your WordPress site’s SEO and performance in 60 seconds!
Diib is one of the best SEO and WordPress monitoring tools in the world. Diib uses the power of big data to help you quickly and easily increase your traffic and rankings. Diib will even let you know if you already deserve to rank higher for certain keywords. As seen in Entrepreneur!
- Easy-to-use automated SEO tool
- Keyword and backlink monitoring + ideas
- Speed, security, + Core Vitals tracking
- Intelligently suggests ideas to improve SEO
- Over 500,000 global members
- Built-in benchmarking and competitor analysis
Used by over 500k companies and organizations:
Syncs with 

Best Cloudflare Settings for WordPress
You should not have any difficulties with the Cloudflare WordPress setup. You can choose one of two different methods. The first is using the one-click setup option located in the control panel of your host. The second is to sign up for Cloudflare manually by visiting the official website. The first option is the simplest way to enable the Cloudflare CDN on your blog or website.
Cloudflare has partnered with some of the most popular hosting services for WordPress to provide an option for an easy setup using their control panel. If there is not a built-in option to set up Cloudflare through your web host, you can manually add the service by visiting the official Cloudflare website. The specific details required to set up Cloudflare for both methods is provided below.
Method One
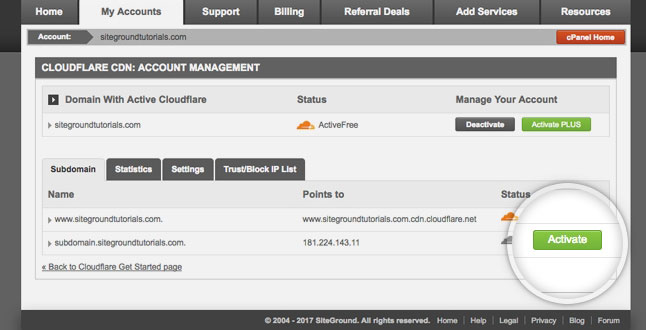
You can set up your Cloudflare CDN through the Setup Option available in your cPanel. You might also find a simple option for certain WordPress hosts such as SiteGround. This will enable the configuration of the Cloudflare CDN through your WordPress. Look in your hosting cPanel for a built-in integration app for Cloudflare. If available, you will be able to enable your service quickly with a few clicks of your mouse. The majority of hosting providers offer a similar option to set up Cloudflare.
Since there are slight variations, the steps provided below are to enable Cloudflare for a WordPress website hosted by SiteGround. If SiteGround is your hosting provider for WordPress, you only need a few minutes to set up Cloudflare on your website. Log in to your cPanel to begin, then navigate to the section for Site Improvement Tools. You will see a Cloudflare icon you need to click on. You might be aware Siteground began the switch to a new control panel recently.
If you have the new SiteGround panel look under your Speed tab to find the listing for Cloudflare. You need to click on the button marked Set Up to continue with your free CDN installation of Cloudflare. You will now see a popup requesting you to connect to your existing Cloudflare account or to create a new one. The next message shows your CDN activation is currently in progress. Wait for your installation to complete. Your Cloudflare CDN is now active on your website.
You Might Also Like
(Image Credit: SiteGround)
Method Two
For the second method, your Cloudflare CDN needs to be set up manually in WordPress. This is the method you need to use if there is not a configuration option available through your web hosting provider. Start by going to the official website for Cloudflare then clicking on Sign Up. You will create your Cloudflare account on the next page by entering a password and your email address. Type in the required information, then click on the button marked Create Account.
The next step is entering the URL for your WordPress website. You need to select your plan on the next screen. You can choose a free plan or select one of the paid plans. Cloudflare will then populate a listing of the DNS records located by their systems. Your subdomains will be included in your list. The DNS records with an orange cloud icon need to pass through Cloudflare. A gray cloud icon indicates the DNS records are bypassed by Cloudflare. For instance:
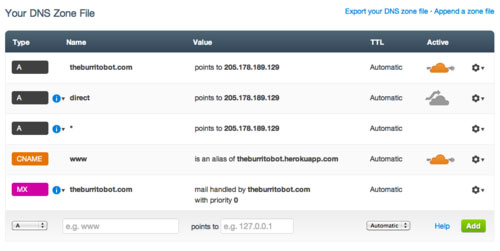
(Image Credit: Cloudflare)
Review your list carefully to ensure Cloudflare lists your primary domain as active with the orange cloud icon. Your next step is verifying your DNS records. Once this step is complete, go to the bottom of your screen and click on Continue. The next step will complete your Cloudflare installation. You will be asked to update your nameservers. You can then change your servers and point them to the nameservers for Cloudflare.
Cloudflare Nameservers Page
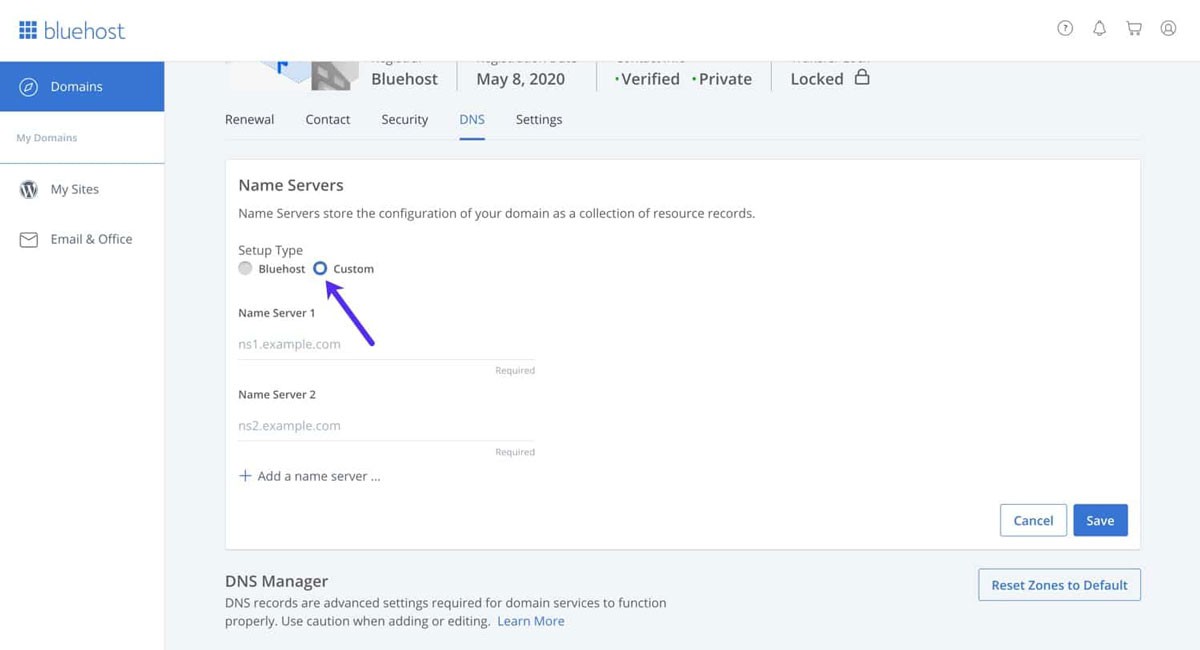
You need to allow some time for the propagation of your name server changes throughout the internet. During this period, some of your users might be unable to access your website. Your name servers can be changed through the account for your domain registrar such as Domain.com. If you are using a free domain you received from a web hosting provider, you need to log into your host account to change your name server. Since this is common with Bluehost, the steps below are for this host.
The process is similar no matter which hosting provider you are using. If you have any doubts, ask for detailed instructions from your hosting provider for your control panel. Start by logging into the cPanel dashboard for Bluehost. Navigate to the Domain section, then choose your domain name. Find the tab marked Name Servers and select the Edit option. Choose the Custom option and type in the nameservers you received from Cloudflare.
(Image Credit: Kinsta)
The next step is adding your Cloudflare Nameservers directly to your web hosting cPanel. Once this is complete, go back to the setup page for Cloudflare. Click on Done, then finish your setup by checking your Nameservers button. You need to allow a few minutes for Cloudflare and your domain nameservers to be activated. Once your activation is complete, a success message will appear on your Cloudflare dashboard. You are now able to use your dashboard for customizing your Cloudflare settings.
Keep in mind, if you are not using Bluehost, there can be slight differences in your setup. There are also slight differences in the nameserver settings for different hosting providers.
Configuring Your Most Important Cloudflare Plugin Settings
By this time, you have already completed the basic setup for Cloudflare. To make certain your WordPress website remains secure, there are some essential settings that need to be configured.
Configuring Specific Page Rules for WordPress
Cloudflare can be customized to work on different pages on your website by setting up your page rules. This is extremely important to secure critical pages including the WP-admin area and your login page. You can set up these rules even if you selected the free account from Cloudflare. If you need to include additional page rules, you can include five more for a fee of $5 per month. At the top of your screen, you will see an option marked Page Rules. Click on this button.
Now click on the button marked Create Page Rule. You are now able to set up the three page rules defined below. This is what it should look like:
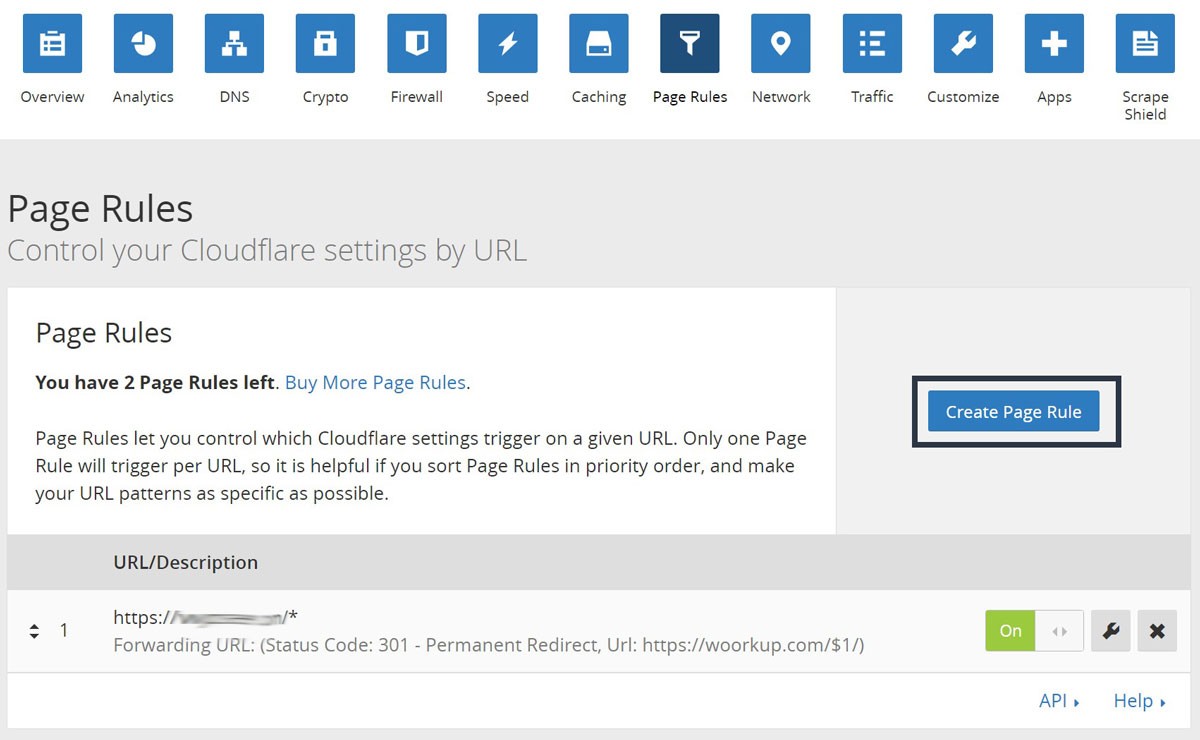
(Image Credit: 5 Balloons)
Securing your Login Page for WordPress
You can create a page rule to secure your login page as a high-security level on Cloudflare.
Enable High Security and Exclude a Cloudflare WordPress Dashboard
Your security level settings need to be on high, your cache level set to bypass and your apps and performance disabled. This will create a page rule for Cloudflare to secure your WordPress dashboard.
Force HTTPS
The third page rule enables the use of HTTPS in your WordPress. Your Setting needs to be set to Always use HTTPS.
Cloudflare SSL Settings
One of the most important settings is for your SSL certificate. Look at the top of your screen to locate the SSL/TSL menu. If you are currently using SSL, you need to select Full. If you do not have an SSL certificate, there is a guide included with instructions to receive a free SSL certificate for your WordPress website. Once you have completed this step, you will receive a green padlock from Cloudflare. This shows your website is secure.
Optimizing Cloudflare Using a Plugin
You can obtain a dedicated WordPress plugin from Cloudflare to optimize your settings for all of the following actions.
- Setup Cloudflare quickly for your WordPress website
- Automatically purging your cache
- Rulesets
- Add WAF or a web application firewall
To begin, your Cloudflare plugin must be installed and activated for your website. Once the process is complete, go to your admin panel and navigate to Settings then Cloudflare. You can now configure your settings for Cloudflare. There is a button market Create Your Free Account on the Settings page. If you have an existing account there is an option for Sign-In. Click on the correct option for your needs. You need to enter your API key and Cloudflare email on the next screen.
Your API key is located on the Cloudflare website in your account section. Open your My Profile page, find API tokens and click. Now return to the section marked Global API Key and click on View. A popup will appear showing your API key. This key needs to be copied. To use your key, return to your WordPress dashboard and enter your API key and email address. You can now save your API credentials for Cloudflare in WordPress. You should now see your home page on your dashboard. You can apply your WordPress optimizations with a single click including enable automatic cache and purge cache.
Optimizing Cloudflare for WordPress
Click on the Settings option to find additional Cloudflare options. You will also see your stats from the Analytics option including threats blocked, bandwidth saved and visitors. For example, here are analytics showing cached and uncached requests:
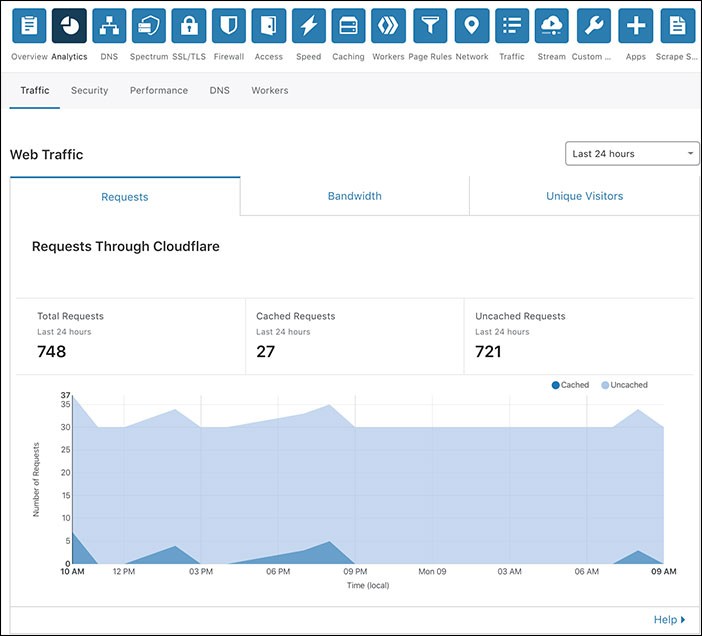
(Image Credit: Cloudflare)
Benefits of the Cloudflare WordPress Plugin
Automatic Platform Optimization
You can substantially improve the performance of your WordPress website with APOs or automatic platform optimizations. This enables your WordPress website to be served by Cloudflare from its edge network. This ensures your visitors receive fast and consistent performance regardless of their locations.
Automatic Cache Purge for Your Website Updates
Cloudflare offers a WordPress plugin to automatically refresh your Cloudflare cache whenever you make changes to the appearance of your website. This allows you to place your focus on your website since Cloudflare makes certain your visitors always receive the most recent content available.
SSL For WordPress
WordPress users can obtain a free SSL certificate from Cloudflare. This certificate secures the data transferred from your website to your customers. Both search engines and consumers have an extremely positive view of secure websites.
We hope that you found this article useful.
If you want to know more interesting about your site health, get personal recommendations and alerts, scan your website by Diib. It only takes 60 seconds.
Optimizing WordPress Settings
You can optimize your WordPress settings with a single click. This is the simplest method for setting up the security and performance of Cloudflare on your WordPress website.
Automatic HTTPS Rewrites to Fix Mixed Content
You can safely eliminate any issues with mixed content on your website with automatic HTTPS rewrites. Your security and performance are enhanced because insecure URLs are rewritten through secure hosts to secure counterparts. When a secure connection is enforced, your WordPress website is equipped with the most recent web optimization features and security standards only available through HTTPS. The toggle for Automatic HTTPS Rewrites is located in the Cloudflare WordPress dashboard for plugins. The image below shows what this should look like:
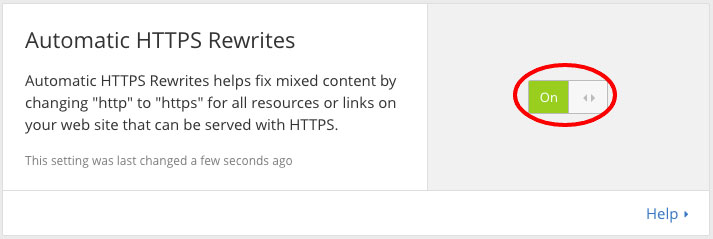
(Image Credit: Geeky Tidbits)
Rulesets for the Web Application Firewall
The WAF or web application firewall is available through all paid Cloudflare plans. Rulesets have been specifically built-in for the mitigation of vulnerabilities and threats to WordPress. This gives you the confidence to know your website is constantly protected from the latest vulnerabilities and threats targeting WordPress websites.
Improving WordPress SEO
The plugin from Cloudflare enhances WordPress SEO with security and performance improvements. An announcement has been issued by Google that all pages with security features including SSL in search algorithms and faster loading pages will be prioritized.
WordPress DDosProtection
The most common threat to websites is DDoS or distributed denial of service. You can protect yourself from hackers by enabling the free DDoS protection offered by Cloudflare.
Diib®: Website Protection and Metrics You Can Use!
No matter the plugins and CDN you choose, Diib will help bring you powerful metrics and alerts when issues arise. Our software integrates with your WordPress site and its plugins. Here are some of the features of our User Dashboard we know you’ll love:
- Customized Objectives give you simple tasks designed to optimize your WordPress site, including plugins
- Alerts that tell you about your Domain Authority other technical SEO issues
- Bounce rate monitoring
- Post performance
- Broken pages where you have backlinks (404 checker)
- Keyword, backlink, and indexing monitoring and tracking tools
- User experience and mobile speed optimization
Click here for your free scan or simply call 800-303-3510 to speak to one of our growth experts.
FAQ’s
The short answer is yes, Cloudflare is quite possibly the best WordPress CDN and firewall service available. Cloudflare helps to speed up your website and keep your website safe and secure.
With 37% of the market share (of managed DNS domains), Cloudflare is the largest and fastest DNS network in the world. They average a few milliseconds query speed.
Cloudflare costs $20 per month, per user. However, they do offer a free version as well as a free trial.
Yes, Cloudflare is one of the most secure and trusted CDNs available. CloudFlare will handle all the requests to your website and offer additional services.
Cloudflare IS good for SEO as it speeds the delivery of your content to your viewers. We know this is one of the ranking factors Google uses.